

At Picnic, we have not been hiding that we like using React Native to build apps. Some time ago we started building the Runner App, the application that’s enabling our Runners to deliver groceries to our customers in React Native. Two years later, we couldn’t be happier with our decision. It has given us exactly what we expected from it: a truly native experience, a small learning curve, and a fast time to market.
After this positive first experience, we decided to expand our React Native usage across the mobile stack by introducing it to the Picnic app. The app used by tens of thousands of customers to do their daily groceries and has been around since the early days of Picnic. To develop our Android app, we started out with Java and adopted Kotlin shortly after it was launched in 2017. Our iOS app is written in Swift.
Over the past months, without our users knowing it, we have secretly been rolling out different features written in React Native. In this article, we will elaborate on our journey of integrating React Native into our native applications.
Why React Native?
Before we dive in, let’s talk a bit about our motivation for adopting React Native to develop features for an existing app built with native technologies. As native developers, we love building our apps in Kotlin or Swift. What we don’t like, however, are the things that come with it: communication overhead, duplicate effort, and divergence between platforms.
Collaborating closely across disciplines is an important aspect of our culture. However, even though we have always aimed to make the Android and iOS teams work together as closely as possible, when specifying a project, there will always be a moment where the teams will do the actual implementation separately.
With this separation comes duplicate effort. After all, not only the code that enables the desired functionality but also all unit tests that verify that behaviour need to be implemented twice. Communicating details of the implementation between the teams also introduces additional overhead. And even the smallest differences in implementation may translate into bugs that appear on one platform but not the other.
By adopting React Native, we are able to share the lion’s share of the code across both platforms.
Challenges
As you can imagine, integrating React Native into an existing application (brownfield development) is a bit more challenging than starting a new project (greenfield development). Two particular challenges stood out to us: integrating the React Native dependencies and data synchronization.
Integrating React Native dependencies
The React Native framework needs to be added as a dependency to the native application. The official documentation includes a dedicated page about embedding React Native into an existing application. It suggests to include all React Native dependencies to the project and then use those to initialize a React Native view when necessary. Doing so would introduce a direct dependency on React Native to the native application.
We believe that our native codebase should not be concerned about the framework that is driving new functionality that we are adding to the app. Therefore, we take a different approach and integrate features written in React Native as separate, standalone modules that expose functionality through a native API. As a result, the boundary between React Native and native is very clear, making it easy to find out which data is being exchanged between the different realms.
Data synchronization
To understand why data synchronization is a challenge, we need to dive deeper into the React Native architecture first. With React Native, applications are built in JavaScript using the React UI framework. At runtime, this JavaScript code runs in the JavaScript virtual machine on a thread separate from the main UI thread.
For components to be rendered, we need to execute code on the main UI thread. And likewise, whenever the user interacts with one of these components the event handlers for that interaction will be called on the main UI thread. So in order to be able to do anything useful from within our JavaScript code, we need to communicate with the main UI thread.
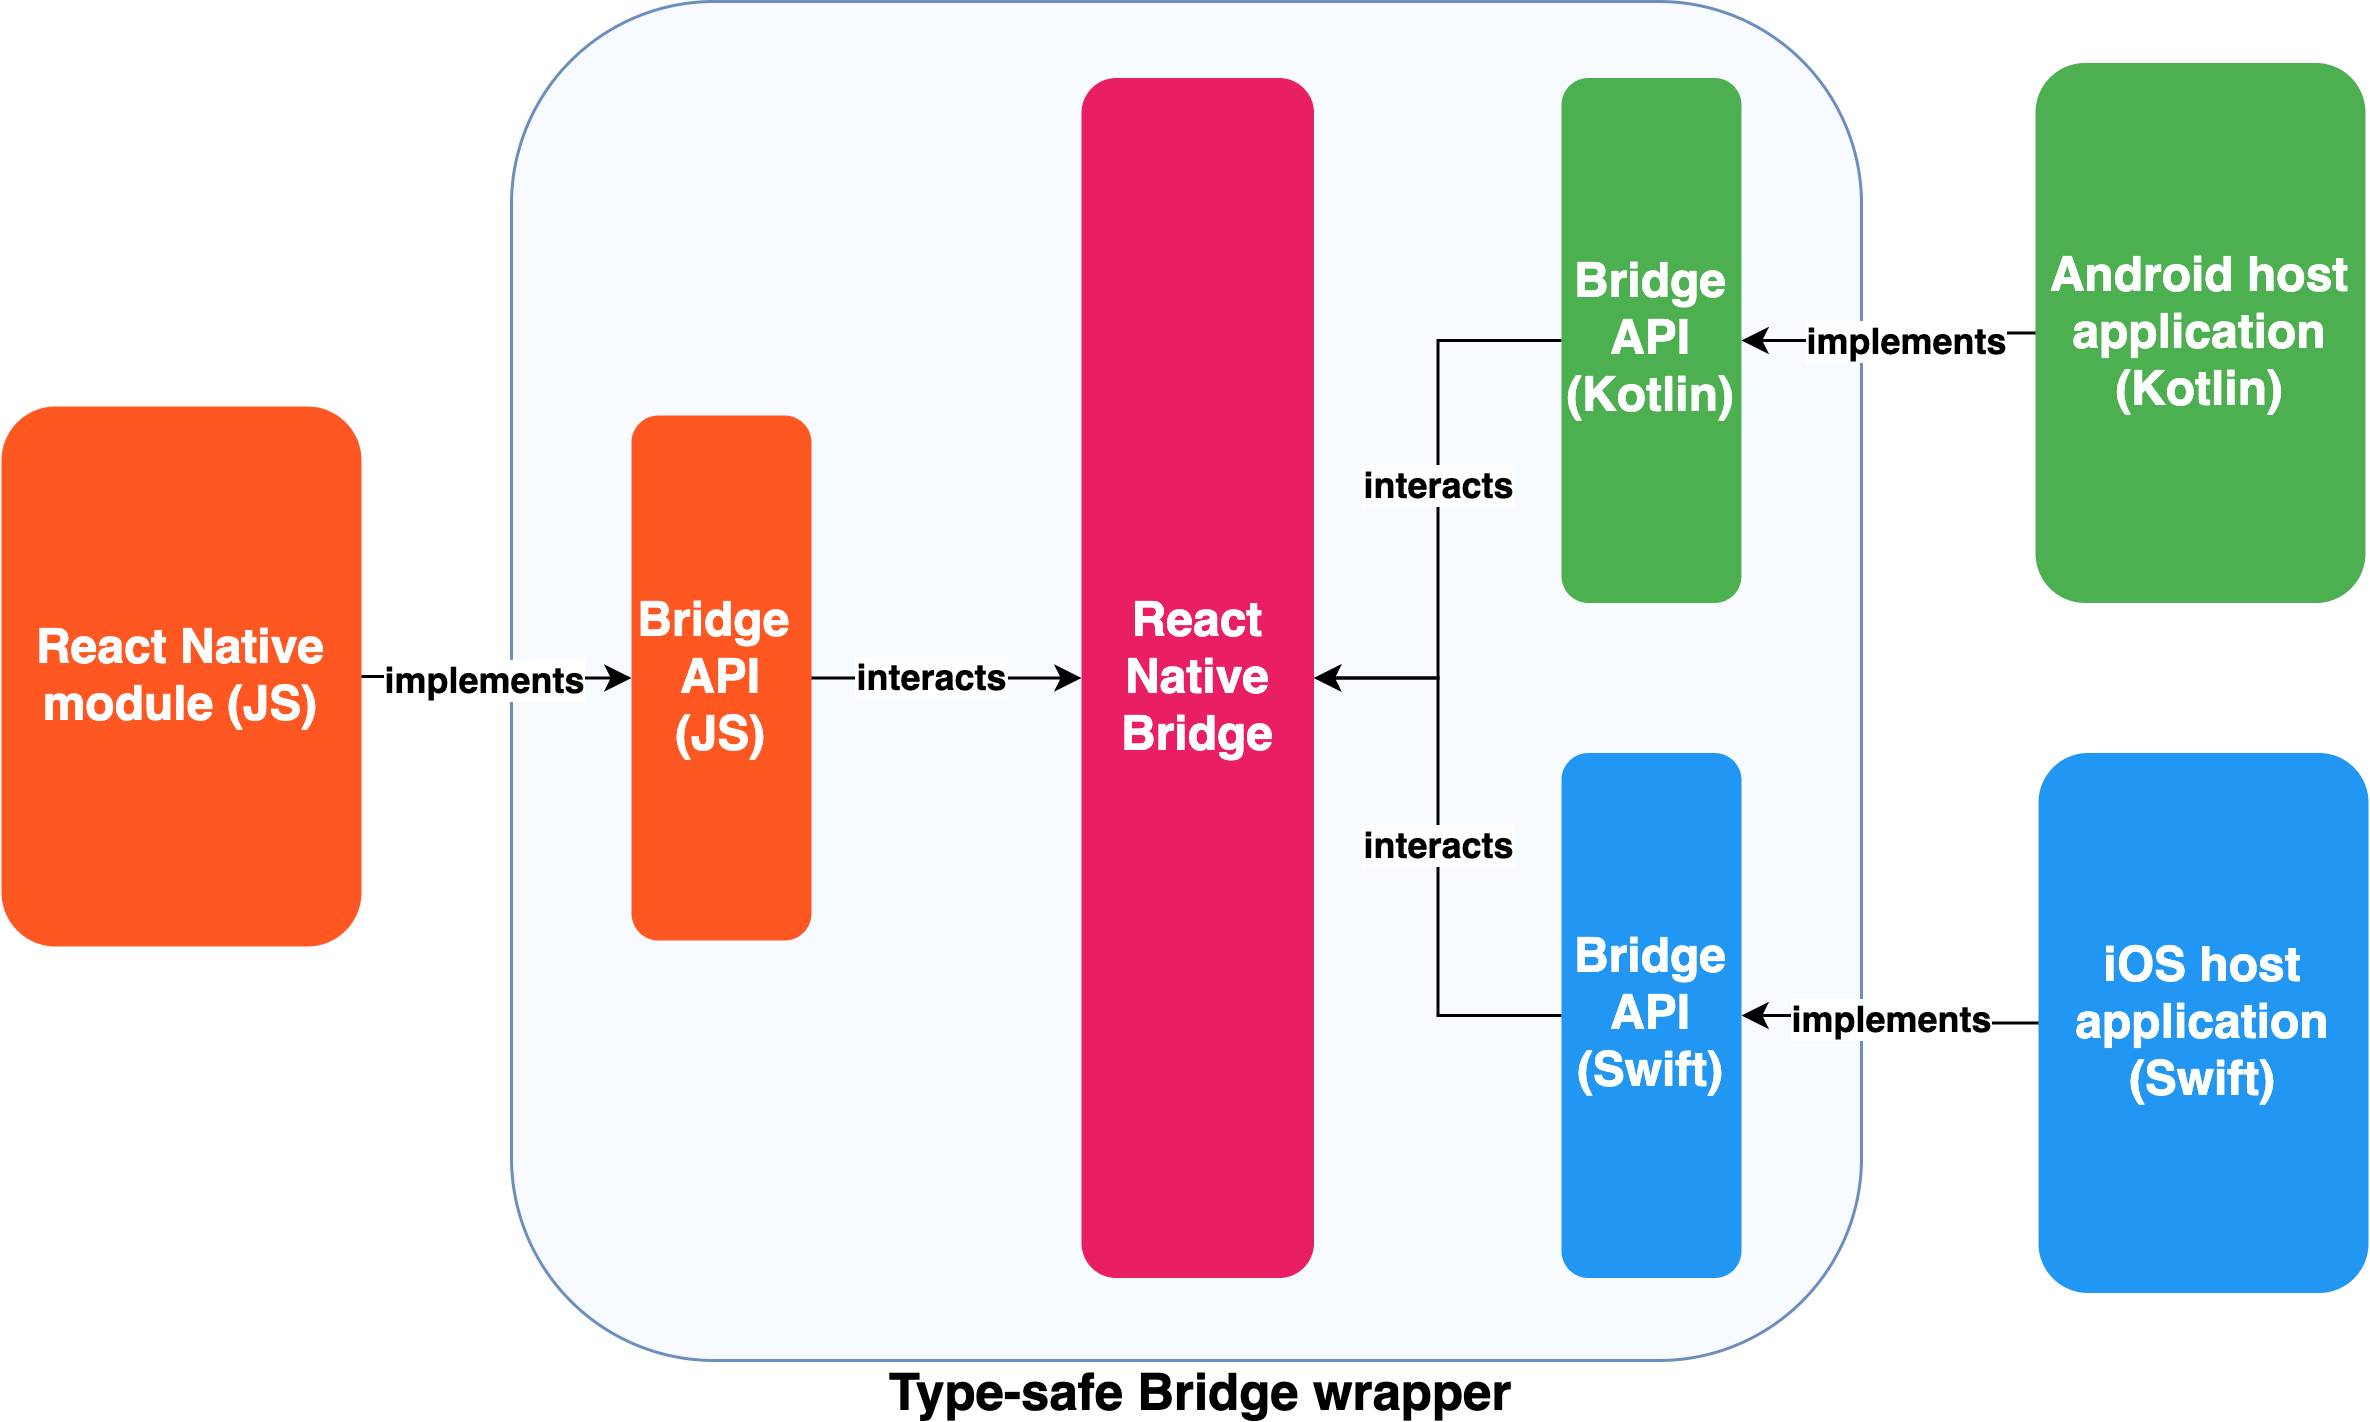
This communication between the main UI thread and the JavaScript thread is enabled by the React Native bridge. To render a component, the JavaScript code sends a description of the element to be rendered over the bridge. A rendering engine running on the main UI thread converts this description into a UI component native to the platform that the application is running on. And when the user interacts with the component, events such as touches are reported back to the JavaScript thread over the same bridge.
When you develop your entire application in React Native, all your code is running on the JavaScript thread so you do not have to worry about the bridge for reasons other than performance. When embedding React Native components into a native application, however, things such as application state and user interaction events need to be synchronized between the native host application and the React Native code running on the JavaScript thread.
As with any API, communication over the bridge is error-prone. One might accidentally change the contract on either the Native or React Native side but forget to update the other. Since the JavaScript code is not statically typed, this may result in unpredictable behavior that is only discovered at runtime.
Electrode Native to the rescue
Initially, we thought of building an infrastructure tool to facilitate the embedding of React Native components ourselves. However, considering that we didn’t even know if React Native would work for us in the Store app, this would be a risky investment. Looking at the available open-source solutions, Electrode Native seemed to provide a solution for both challenges outlined above.
Using Electrode Native we can bundle multiple React Native screens or flows (so-called MiniApps) together. The individual MiniApps are distributed in a modularized approach using separate NPM packages. When packaging such a module, standalone libraries for both iOS (as a Framework) and Android (as an AAR file) are generated that can be integrated into the native application as standalone modules and expose their functionality through a native API.
Electrode Native also makes data synchronization between the Native and React Native realms less error-prone. All interactions between native and React Native can be described in a Swagger schema, from which type-safe wrappers for both ends of the bridge are generated.
Developing the first feature
Now that we figured out what the infrastructure should look like; it was time to get started with the first actual feature. However, we didn’t know yet how React Native would behave in our Store app. We decided to play it safe and only build a single screen with React Native, the contact screen. A simple screen containing our opening hours, some contact buttons, and a nice image. Any mobile developer would probably consider this the most simple screen they would ever implement. However, it was complex enough for us to verify whether or not we could ship a React Native feature alongside our existing codebase.

Even with this small feature, we wanted to validate as many of our assumptions as possible. Therefore, we chose to only build the UI in React Native, but feed it with data from the host application and propagate user interactions back to the Native side using the generated API wrapper.
Building the React Native module
Building the React Native module was a straightforward process. We opted to use the same stack as we did for the Runner App.
To ensure type-safety throughout our codebase we wrote all our code in TypeScript with all strict rules enabled. Experience taught us that it’s definitely worth spending some more development effort to avoid problems later on when refactoring code.
Providing the best UX experience for our users has always been one of our core values. Therefore, new features written in React Native should blend right into our existing native application. To achieve this, we’ve spent significant effort on setting up a proper design system to power our React Native modules. We’re using styled-components to ensure consistent theming and storybook to document our UI components. Snapshots are automatically generated for each story using story-shots and React Native Storybook Loader. These snapshots are compared against the current implementation of each component as part of our Jest unit test suite.
Lastly, we use React Navigation and redux for state management.
Integrating the React Native module
Thanks to the native API wrapper, integrating the React Native module into the host application was as straightforward as integrating any other third-party framework. The main difference is that we’ll have to add a single line to our application’s entry points, to make sure React Native is fully initialized and ready to render our contact screen when it needs to be presented.
Dealing with localization
Picnic operates in multiple countries. This means that our copy and accessibility strings have to be provided in multiple languages. Luckily, sharing strings between native and React Native turned out to be super easy. We were already managing our strings externally using our localization tool called Localicious. It already supported rendering iOS and Android string files so we could easily extend it to also render string files for our React Native project.
Rollout strategy
Even though the contact screen is not that critical for the shopping journey, we still want to guarantee that our customers can reach us at all times. Therefore, we decided to enable the React Native contact screen only when its feature toggle is enabled. We initially enabled the new screen for a couple of hundred customers. This allowed us to keep a close eye on our benchmarks, before releasing it to everyone. Luckily, we didn’t face any problems after the initial release.
Conclusion
Even though this was just about releasing a simple contact screen, it was a big step for us. It not only showed that we could build a contact screen but opened the door for building any feature in React Native. Being satisfied with the results, we are now using React Native for more complicated use-cases, greatly reducing the amount of code that needs to be maintained across platforms.
Thanks a lot for reading! Stay tuned for our next blog posts in which we’ll tell you more about the React Native development at Picnic.

