Today we are officially releasing Localicious, our tool to manage localization of the copy in our apps.
For those of you that are not well-versed in app development slang: copy is the term we use to refer to the text we put on UI elements such as labels and buttons. Great copy helps the user navigate and use your app effortlessly and can lead to significantly better conversion when applied well.
If your app supports multiple languages, this copy has to be translated into each language that it supports, a process that we refer to as localization or l10n. This process gets more complex as the amount of copy and the number of people working on the app increases. Several tools exist to help development teams deal with this complexity.
At Picnic, we could not find an existing tool that worked well for us. Some of them we found to be insufficiently developer or copy-writer friendly while others did not match our process well. In a previous blogpost, my colleague Ron Mulder explained our process and reasoning in detail.
Ever since that blogpost was published, we have been using and improving our tool within Picnic. It has now reached a state in which it is ready to be used outside of Picnic as well.
What Localicious can do for you
With Localicious, you maintain all your localized copy in a YAML file: the Localicipe. From this Localicipe, you then generate localization files for Android and iOS by running Localicious. On top of that, Localicious has a few features that aim to smoothen the process.
First of all, the integrity of the Localicipe can be verified using YAML schema validation. This adds checks and balances to the editing process that enable both developers and copywriters to contribute localized copy autonomously.
Besides copy, additional localization is required if you want your app to be accessible for visually impaired users. To this end, the Localicipe can be extended to include accessibility hints, labels and values for each UI element.
Apart from generating a localization file, Localicious also renders a Swift wrapper around it. Using this wrapper, you can reference your localized strings in a type-safe manner, rather than relying on their identifiers. Moreover, the generated code contains extensions for the standard iOS UI elements, allowing you to set all localizable properties of these elements with only 1 line of code.
And finally, Localicious comes with an option to combine retrieving, validating and converting the Localicipe in one simple command that can be integrated in your build workflow.
Using Localicious
Before we can start using Localicious, we need to add it to our project. We’ll do so by installing it from the NPM package repository:
> yarn add "http://twitter.com/picnicsupermarket/localicious" target="_blank" rel="noreferrer noopener">@picnicsupermarket/localicious -- save-dev
We can verify that Localicious was added successfully by running it:
> yarn localicious
Usage: localicious [options] [command]A toolchain for working with localization files in a platform-agnostic way.Options:
 -V, — version output the version number
 -h, — help output usage informationCommands:
 validate <localicipe> Validate a Localicipe.
 render <localicipe> <output_path> Render a Localicipe.
 install <localicious_config> <output_path> Pull a Localicipe from a source, validate and render it.
 help [cmd] display help for [cmd]
✨ Done in 0.11s.
With that out of the way, using Localicious is as simple as counting to three.
Step 1: Create a Localicipe
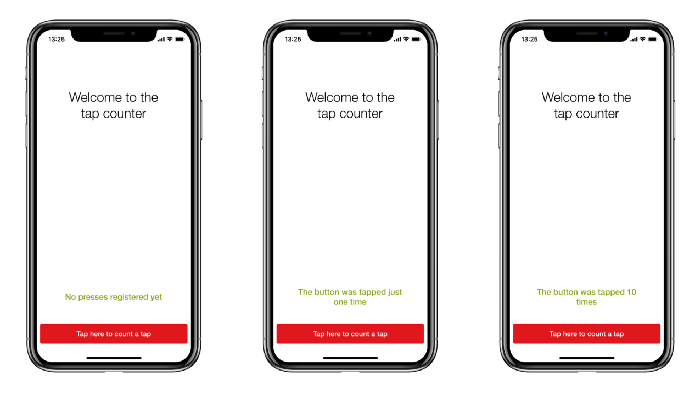
For the scope of this blog post, we will be creating a simple app that displays the number of times a button was pressed. It looks like this:

Let’s start simple and add localization for the title of the screen and the button:
SHARED:
  CounterModule:
    CounterScreen:
      TitleLabel:
        COPY:
          en: “Welcome to the tap counter”
          nl: “Welkom in de tapteller”
      CountButton:
        COPY:
          en: “Tap here to count a tap”
          nl: “Tap hier om een tap te tellen”
Next, we’d like to localize the label that displays the number of times the button was tapped. We want to change the copy depending on the number of times the button was pressed. Moreover, in case the button was pressed more than once, we use string interpolation in our code to display the amount of times it was pressed. We can achieve both by adding the following to our Localicipe:
      CountLabel:
        COPY:
          ZERO:
            en: “No presses registered yet”
            nl: “Er is nog niet op de knop gedrukt”
          ONE:
            en: “The button was tapped just one time”
            nl: “Er is één keer op de knop gedrukt”
          OTHER:
            en: “The button was tapped %1{{d}} times”
            nl: “Er is %1{{d}} keer op de knop gedrukt”
Our product manager comes in to tell us that Android users don’t seem to like our app that much. They open the app but never tap the button. To make them feel more welcome, we decide to add an extra greeting for Android users only. Since we don’t want the localization for this greeting to end up in the localization files generated for iOS as well, we add an additional section to the Localicipe:
ANDROID:
  CounterModule:
    CounterScreen:
      WelcomeLabel:
        COPY:
          en: "We're glad you're here!"
Finally, we add some accessibility information to the button to help our visually impaired users understand what they need to do:
      CountButton:
        ACCESSIBILITY:
          HINT:
            en: “Tap this button to count a tap”
            nl: “Tap op deze knop om een tap te tellen”
Step 2: Validate the Localicipe
With localicious we can validate that the above Localicipe is correct, meaning that it will be rendered properly for the target platform of our choice. The validate command takes three inputs:
- The path to the Localicipe
- A comma-separated list of required languages. If for any entry, no localization is provided for a required language the validation command will fail.
- Optionally, a comma-separated list of languages for which a localization is allowed, but not required. Using this option, you can gradually add localization for a new language without failing the validation step.
You’ll see that running the command on our Localicipe fails:
> yarn localicious validate ./Localicipe.yml --required-languages en,nl
❌ Your Localicipe contains validation issues:
 — /ANDROID/CounterModule/CounterScreen/WelcomeLabel/COPY should have required property ‘nl’
Adding a dutch translation for that key should fix the issue and yield the expected result: a valid Localicipe.
> yarn localicious validate ./Localicipe.yml --required-languages en,nl
✅ Your Localicipe is perfect, keep up the good work!
✨ Done in 0.31s.
Great! On to the next step.
Step 3: Generate localization files
Now that we know that the file is valid, we can convert the above Localicipe to the localization files required for Android and iOS using the render command.
This command takes 4 inputs:
- The path to the Localicipe
- The output path
- A comma-separated list of languages for which we want to render the localization files
- A comma-separated list of platforms for which we want to render the localization files
Let’s run the command to generate output for both Android and iOS.
> yarn localicious render ./Localicipe.yml ./output -l nl,en -p android,ios
✅ Your Localicipe has been rendered successfully for platforms: android,ios and languages: nl,en.
✨ Done in 0.58s.
Inside the output directory, we’ll find the following strings.xml and Localizable.strings files:
/* Localizable.strings */
"CounterModule.CounterScreen.TitleLabel.COPY" = "Welcome to the tap counter";
"CounterModule.CounterScreen.CountButton.COPY" = "Tap here to count a tap";
"CounterModule.CounterScreen.CountButton.ACCESSIBILITY.HINT" = "Tap this button to count a tap";
"CounterModule.CounterScreen.CountLabel.COPY.ZERO" = "No presses registered yet";
"CounterModule.CounterScreen.CountLabel.COPY.ONE" = "The button was tapped just one time";
"CounterModule.CounterScreen.CountLabel.COPY.OTHER" = "The button was tapped %1$d times";<!-- strings.xml -->
<?xml version="1.0" encoding="utf-8"?>
<resources>
  <string name="CounterModule_CounterScreen_WelcomeLabel_COPY">We are glad you are here!</string>
  <string name="CounterModule_CounterScreen_TitleLabel_COPY">Welcome to the tap counter</string>
  <string name="CounterModule_CounterScreen_CountButton_COPY">Tap here to count a tap</string>
  <string name="CounterModule_CounterScreen_CountButton_ACCESSIBILITY_HINT">Tap this button to count a tap</string>
  <plurals name="CounterModule_CounterScreen_CountLabel_COPY"
    <item quantity="zero">No presses registered yet</item>
    <item quantity="one">The button was tapped just one time</item>
    <item quantity="other">The button was tapped %1$d times</item
  </plurals>
</resources>
Note how the file for Android contains an additional entry for the Welcome Label title when compared to the iOS file.
Besides these two files, for iOS you’ll also find a Localizable.swift file containing generated code. Using this code to localize our UI elements, rather than using NSLocalizedString directly comes with several benefits. First of all, it allows us to configure all properties for a UI element that we wish to localize using a single line of code:
let countButton = UIButton(type: .system)
countButton.setLocalicious(
  L.Counter.CounterScreen.CountButton,
  for: .normal
)print(countButton.accessibilityIdentifier)
print(countButton.accessibilityHint)
print(countButton.title(for: .normal))
Executing this code will print:
Counter.CounterScreen.CountButton
Tap this button to count a tap
Tap here to count a tap
Note that the accessibility identifier is assigned the path to take through the Localicipe to arrive at the localization definition for the element. This identifier is used by frameworks like Appium to identify elements in automated tests. Using Localicious we have automatically made all elements in our app that have localization identifiable by Appium!
The second benefit is that we now have a safe wrapper for arguments passed into a string:
let numberOfTaps = 0
let countLabel = UILabel(frame: CGRect.zero)
countLabel.setLocalicious(
  L.Counter.CounterScreen.Counter(quantity: numberOfTaps)
)
In this example the argument that needs to be passed in is pretty clear, but this feature really comes in handy for strings that accept multiple arguments.
For the final benefit, consider that we change the Localicipe to rename the identifier of the label that shows the number of taps from Counter.CounterScreen.Counter to Counter.CounterScreen.CountLabel. All places in our app where we use L.Counter.CounterScreen.Counter will now cause compilation of our app to fail, preventing an error from happening at runtime.
This sounds great! Where can I learn more?
Want to know more about Localicious? We have you covered:
- Check out this blogpost, in which our copy hero Ron Mulder explains why we built Localicious and goes into our workflow in more detail.
- Check out the video of a presentation Lucas Twisk gave at the dutch Cocoaheads meetup.
- Checkout out the README for the nitty-gritty details.
We hope that Localicious will help you as much as it helps us. If you decide to use Localicious in any of your projects, we’d love to hear from you! Please reach out with any comments or questions you may have in the comments or by filing an issue in our repository.
Acknowledgements
Localicious would not have been what it is today without the feedback from it’s initial users in Picnic (in chronological order): Ron Mulder, Jennifer Dolinski, Sidharth Juyal, Zmicier Zaleznicenka, Martin Joubert, Florencia Bosch, Lucas Twisk, John Salib, Leonardo Wistuba de Franca and Monika Pencierzynska.
Special thanks to: Lucas Twisk for contributing the code generation and helping to polish up the code for this open source release, and Wiemer Viet for the illustrations that accompany this post.


 Erdem Erbas