Here at Picnic, we’re in the process of building our first automated warehouse. When you think of an automated warehouse, your first thought might be of a robot putting together your grocery order. On the contrary, we will still have humans running our warehouses! Part of the software we are developing now is a user interface to guide our hard-working employees through all of the processes required to manage a warehouse, from creating stock in the system after a delivery by the supplier, to putting together your grocery order.
The application that guides users through these important warehouse processes is a wizard-style application. This means there are a number of steps to guide through, which can change based on either input from the user (entering the best-by-date of a product we have just received, for example) or input from the server (like indications that an issue has been detected). To further complicate things, a lot of our processes share a very similar look and feel while having different business needs. This leads us to a dilemma with a couple of not-so-great options:
- Create specific sub-flows where we duplicate the necessary components to allow us to slightly change their behavior based on a given sub-process;
- Reuse components, but litter the code with if/else statements and context variables to be able to determine which sub-process we are executing at any given time.
The average engineer, when presented with such a dilemma, will either run screaming for the hills or try to invent a way around it. Enter: front-end development with state machines!
What is a state machine?
A state machine, or more accurately called a finite state machine is a model that describes a system that can only be in one state at any given time. A finite state machine has a finite number of states and a finite number of events that can transition the machine from state to state. To take an example from the docs for XState, a state machine library that Picnic uses, a state machine can be described like this:
Let’s say you can be represented by a state machine with a finite number (2) of states: asleep or awake. At any given time, you’re either asleep or awake. It is impossible for you to be both asleep and awake at the same time, and it is impossible for you to be neither asleep nor awake.
What does this have to do with front-end development?
If you think about it, any front-end application you interact with can be described using a state machine. Every screen can be represented as a state, and there are a finite number of events that can transition you from screen to screen.
For a simple website where a user clicks links to be taken to pages, it might be overkill to apply this concept to the development process. But that’s not what we build at Picnic. The applications we build to guide users through the processes of running the automated warehouse are anything but simple!
Each of our complex warehouse processes is represented by a state machine. Many of these state machines contain smaller state machines, which allows us to share logic where necessary while still maintaining the control that the larger state machine has.
This separation allows our navigation logic and any unrelated business logic to be maintained separately. A component that asks a user to scan a package doesn’t need to know any information about where the user is headed next — it only needs to know whether or not a package has been scanned. It reports this information to the state machine, and the state machine is able to determine where to go next.
An example
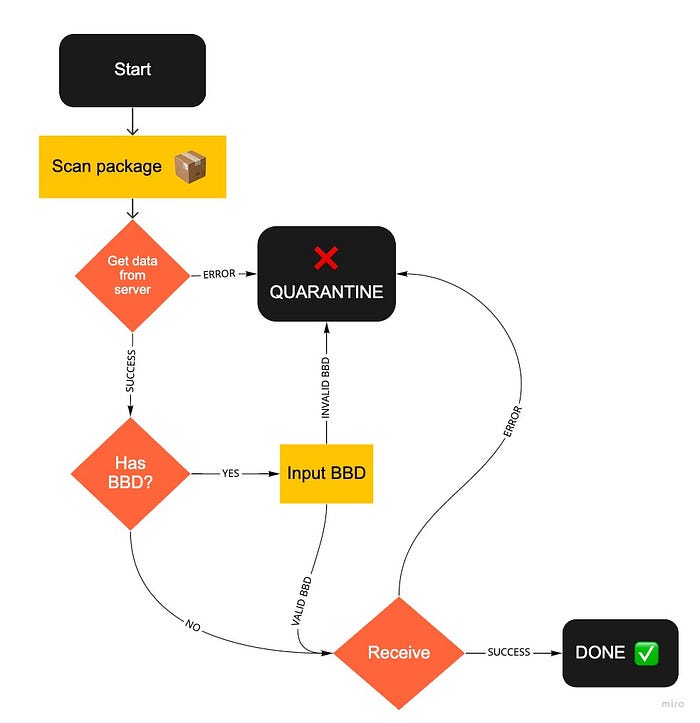
Consider the earlier mentioned case of receiving products to the warehouse. The user will scan the product, where the server will gather data like “does this item have a best-by-date (also known as BBD) that we need to sell it before?” (items like milk have a BBD, whereas items like toilet paper do not). The user may also input data, like entering the BBD for the milk being received. If any of these steps fail (maybe the server did not have data for this product, or the milk came from our supplier already expired), we also have to direct the user to handle these cases by placing them in a “quarantine” area to be dealt with later. Here’s a simplified version of these steps:

In XState, the library we use for state machine management, a simplified version of this machine would be represented like this:
"f086" data-selectable-paragraph="">const receiveMachine = Machine({
    id: 'receive',
    initial: 'scanPackage',
    states: {
      scanPackage: {
        on: {
          SCAN: 'getData'
        }
      },
      getData: {
        on: {
          SUCCESS: 'checkClearingPolicy',
          ERROR: 'quarantine'
        }
      },
      checkClearingPolicy: {
        on: {
          BBD: 'inputBbd',
          NONE: 'receive'
        }
      },
      inputBbd: {
        on: {
          VALID: 'receive',
          INVALID: 'quarantine'
        }
      },
      receive: {
        on: {
          SUCCESS: 'done',
          ERROR: 'quarantine'
        }
      },
      quarantine: {
        type: 'final'
      },
      done: {
        type: 'final'
      }
    }
  });
Receiving is an action that may happen in multiple different warehouse processes, which means that this state machine may be used within several other state machines. The components themselves do not need to know anything about which sub-process they are executing in — they only need to inform the state machine when they are finished with their own responsibility. The “parent” state machine can then control which side effects (such as API calls) are executed as a result of these actions. This allows for the easy reuse of components between different processes, as no shared component needs any process-specific knowledge.
A (very simplified) look at a parent state machine using this receive machine might look something like this:
"713a" data-selectable-paragraph="">const unloadTruckMachine = Machine({
  id: 'unloadTruck',
  initial: 'scanPallet',
  states: {
    scanPallet: {
      on: {
        SCAN: 'receiveItems',
      },
    },
    receiveItems: {
      invoke: {
        src: receiveMachine,
        onDone: 'scanPallet'
      },
    },
  },
})
This invokes our previously created machine with variable name receiveMachine, and when that machine reaches its final state, it transitions back to the scanPallet state to receive the next pallet.
To ensure that the components do not need any state machine-specific knowledge, we also have a StateMachineService that is responsible for managing the current running state machine and forwarding events to it.
To see what this looks like in practice, let’s take our package scan as an example again. Our package scan component might look something like this
"1833" data-selectable-paragraph="">export class PackageScanComponent {
  constructor(private stateMachineService: StateMachineService) {}"b33f" data-selectable-paragraph="">  scan(barcode: string) {
    this.stateMachineService.send('SCAN', { barcode });
  }
}
In practice, we use TypeScript enums for our actions to make them easier to manage, but for this example, we’ll use a plain string.
A simplified version of our state machine service might look like this:
"b029" data-selectable-paragraph="">export class StateMachineService {
  machine: Interpreter;"1163" data-selectable-paragraph="">  setupMachine(machine: StateMachine) {
    this.machine = interpret(machine).start();
  }"f92e" data-selectable-paragraph="">  send(event: string, payload?: any) {
    if (this.machine) {
      return this.machine.send(event, payload);
    }
  }"1f50" data-selectable-paragraph="">  destroyMachine() {
    this.machine.stop();
  }
}
In another previous component, we’ve set up our receiveMachine to be the machine running. When a package is scanned, the state machine service will forward the SCAN event to the receiveMachine.
The receiveMachine will enter the state getData which will trigger it to make a backend call (we’ll leave this part out for simplicity’s sake). Then we’ll use the results of this call to determine if this product requires a BBD or not. If it does, we’ll route the user to the next screen to input this date. Finally, we can validate this date and determine if this product should be placed in a “quarantine” area for someone to deal with later or if we can go ahead and put it on the shelves to eventually be used in customer orders.
If another warehouse process needs to use this same logic and order of actions, it can easily reuse this logic. If another process needs to use the ScanPackageComponent and do something completely different with the results, it can just handle the SCAN event differently within its own state machine.
Next steps
The examples here are very simplified. XState supports lots of functionality — you can execute actions on entry or exit to a state, call actors, invoke other state machines or observables, and run conditional guards before entering a state. We use all of this functionality to execute our processes with all of their accompanying logic. Our machines are also much more type-safe than what is shown here!
State machines offer us a way of making very complex front-end processes much more manageable. They are a useful and accurate model for representing complicated front-end systems and managing control flow. After implementing one warehouse process for solving issues with customer order totes, building a similar process (with slight differences) was fast and easy — we were able to share components directly while executing completely separate business logic, without a lot of cluttered if statements. Reusable components and clean separate business logic, what more could you ask for?


 Erdem Erbas


